A Step Up
Co-Designer
My co-designer is Jocelyn, who is one of my friend's aunts. She is a retired doctor and enjoys gardening in her free time.
Jocelyn also has Parkinson's disease, which means she often has a hard time balancing, turning quickly, and lifting heavier objects. As a result, she often has trouble reaching higher places of storage around her house, which she wishes to use safely and effectively. Existing stools have provided little assistance in terms of balance; the stool she currently has is 9 inches tall and help her reach shelves. However, the stool has a small surface area, which gives little room for movement or stabilization. Additionally, while using the stool she has, Jocelyn has to hold onto tables or other sturdy structures to add extra support.
Co-Designer Needs Statement
Jocelyn needs to be able to:
- steadily reach higher shelves in her house
- maintain her balance while reaching for higher places
- lift the product herself
- store the product in compact spaces
Product Requirements
The product must:
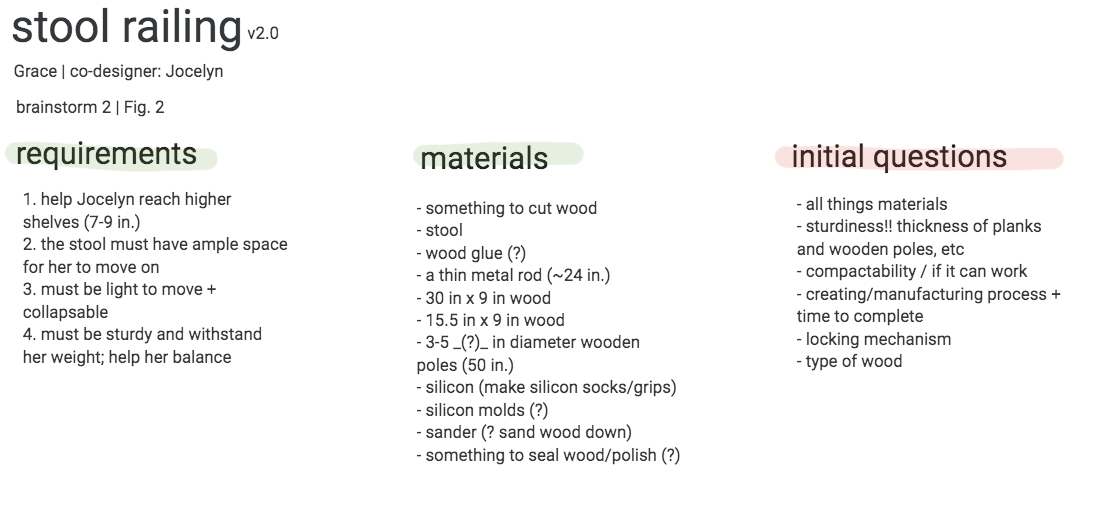
- help the co-designer reach higher shelves, giving her 7-9 in. of height
- have ample space for standing and moving on with a length & width of at least 20 in x 15 in
- must not tip over/be able to withstand at least 150 lbs
- be light enough to move — definitely no more than 20 lbs
- be collapsable + easy to store
Initial Brainstorming Narrative
The idea of my project is to create sturdy railings around a 7-9 inch high, relatively large stool. First, I assessed the product requirements with my co-designer and thought about some tools we use to access higher shelves—we use ladders, smaller step ladders, and stools. Since the product had to have ample space for movement and had to be relatively light to move, I decided to build my concept around something similar to a stool, as my extended searches yielded very little.
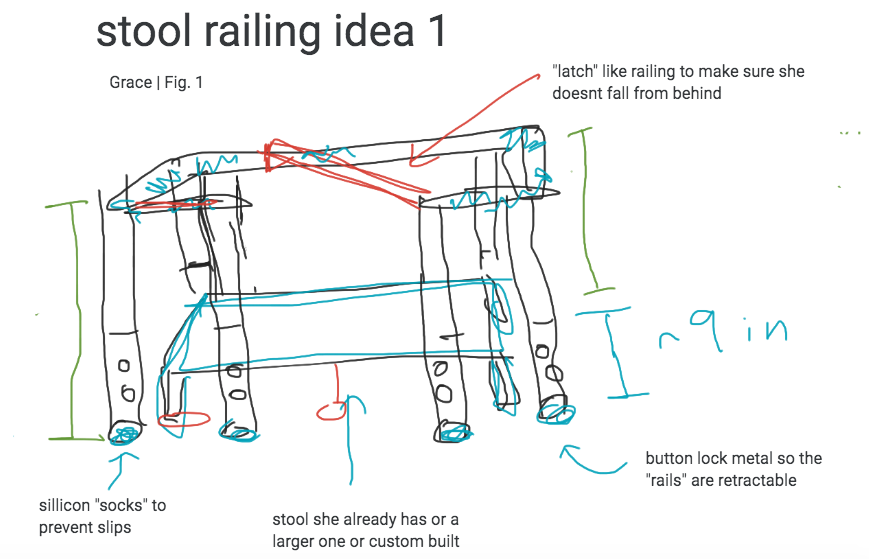
I originally wanted to create the railings on all four sides of the stool with retractable metal rods, which was inspired by the stick on a roller backpack (as shown in Fig. 1). I thought that if the metal legs of the railing was retractable, it would allow the railing feature of the design to be much more compact. However, due to limitations caused by the pandemic, I realized that learning to weld and finding the welding tools would be pretty difficult.
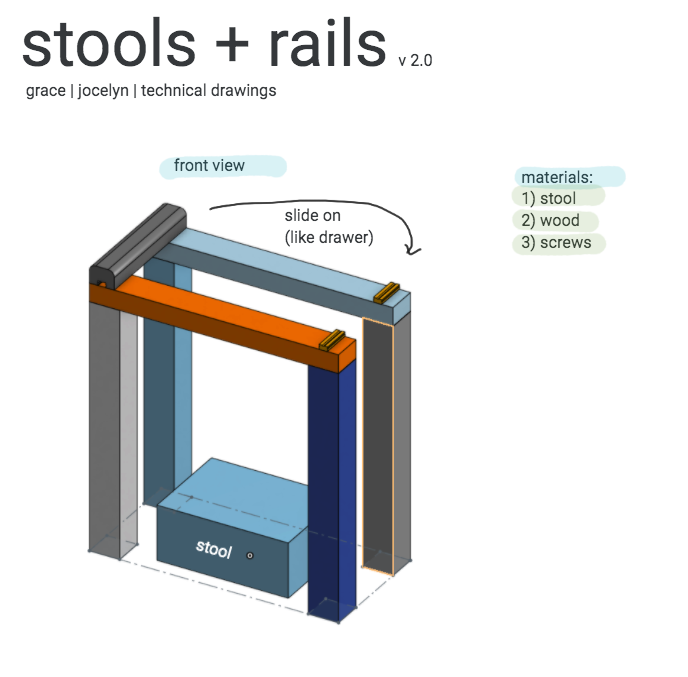
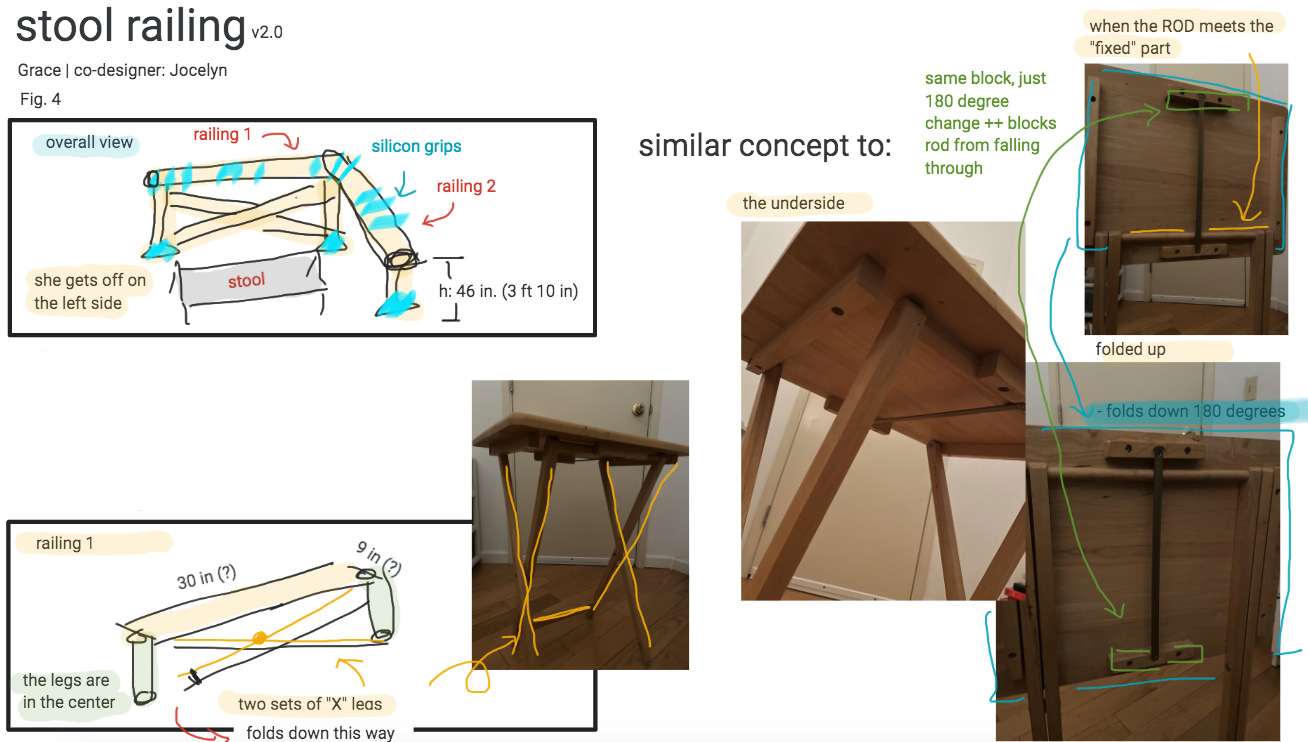
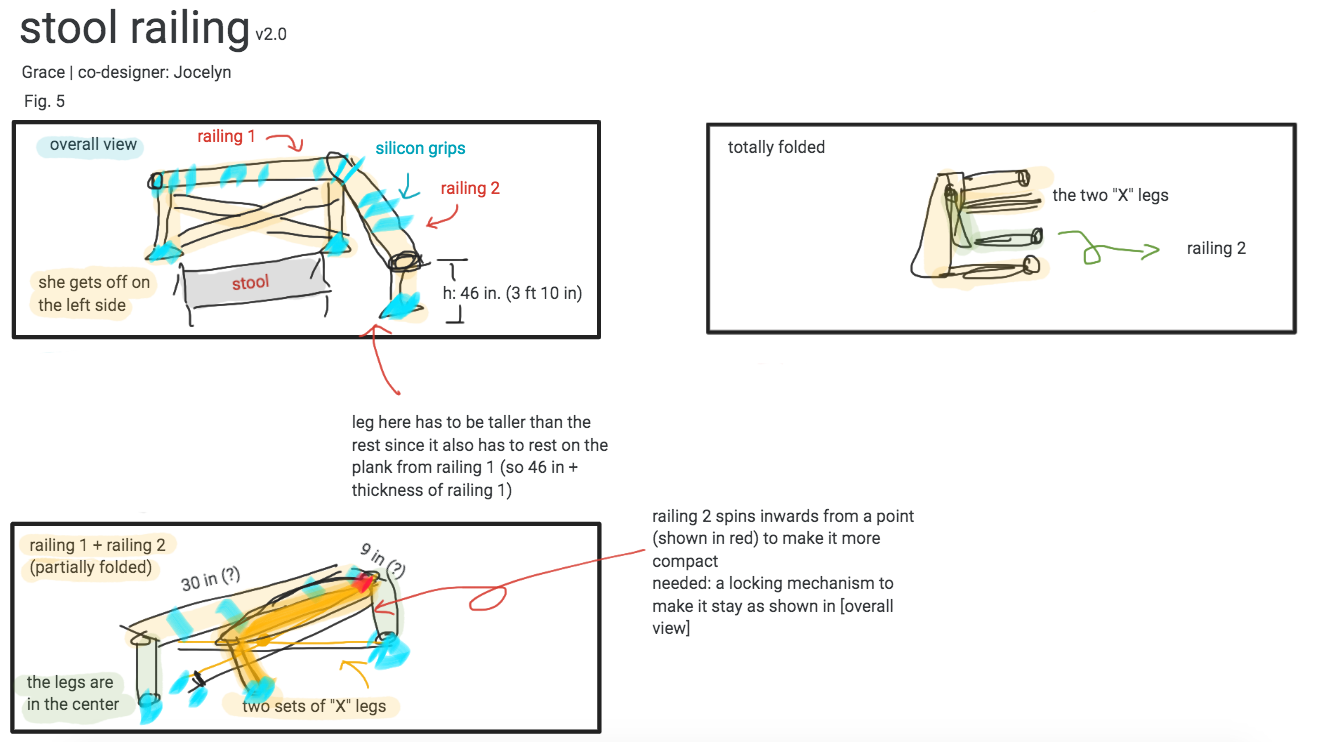
Then I moved on to change the design to wood as I've had a little bit of experience in the past with woodworking. However, after changing the design to wood, the issue then became making the project compact. With remote learning, brainstorming became a much more individual task—this meant that there was much more room for error. I decided to continue consulting my co-designer and actually visited her in person to take some measurements. After creating some rough cardboard prototypes, taking some measurements, and ping-ponging some ideas with my co-designer, I was inspired by a small, foldable table in her house (which I coincidentally had as well) and I was able to incorporate the folding elements into my design (Fig. 4).
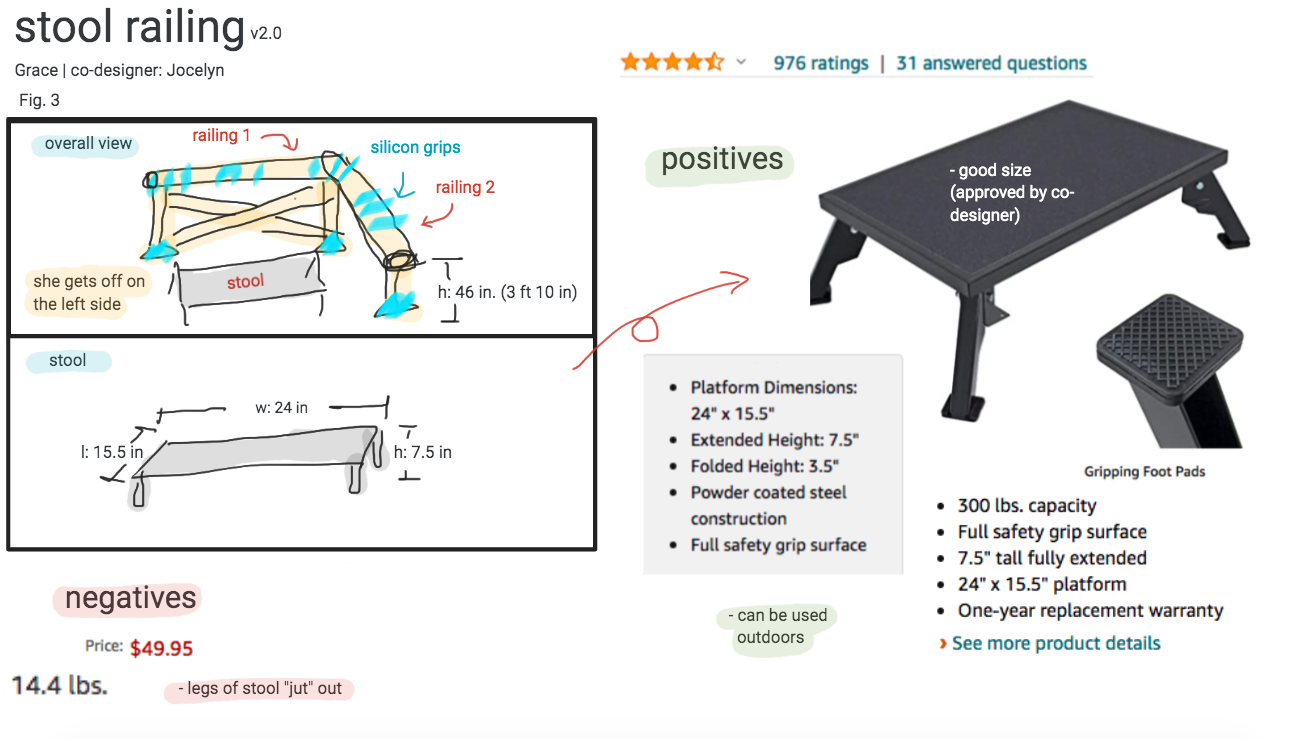
After learning that the current stool my co-designer had wasn't ideal in terms of surface area, I started looking into larger stools on Amazon and discussed the options with my co-designer. Ultimately, we found a stool designed for RVs that was 24" x 15.5" and had an extended height of 7.5"; it had 4.6/5 stars from nearly 1000 reviews and was also great for the outdoors, which would be great if the project extended to help my co-designer garden particularly tall tomatoes.
Moving forward, I have to determine some more measurements to ensure the sturdiness of the design, determine/order the right materials, and consult the instructors for feedback on the design (especially with how many sides to put "railings" on). I'm really excited to start building and create a project that could help my co-designer!
Initial Prototype
Overall Design Objective:
The objective of Stools+Rails is to create a design that could help the co-designer, Jocelyn, be able to reach higher shelves easier and safer while remaining relatively light to transport.
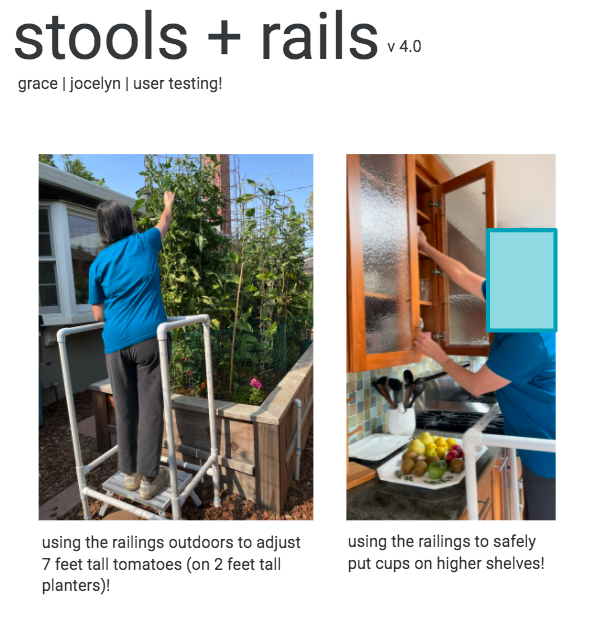
The objective will be met when the co-designer is able to reach higher shelves (or tall tomatoes) with ease and expresses satisfaction in the product's safety and weight.
Prototype Design Objectives
I want to work on creating a prototype that solves the problem of safety and has correct measurements; due to shipping and pandemic constraints, creating a compact prototype will be an objective to focus on in the future. I will be able to move on to the next prototype once the co-designer is satisfied with the current prototype.
User Assumptions:
Stools+Rails would be used indoors (for reaching higher shelves) and outdoors (for gardening purposes).
Stools+Rails would be put against at least one sturdy surface (ex. kitchen counters, planter box, etc.)
(Note that the product name Stool+Rails was later changed to A Step Up.)
Bill of Materials
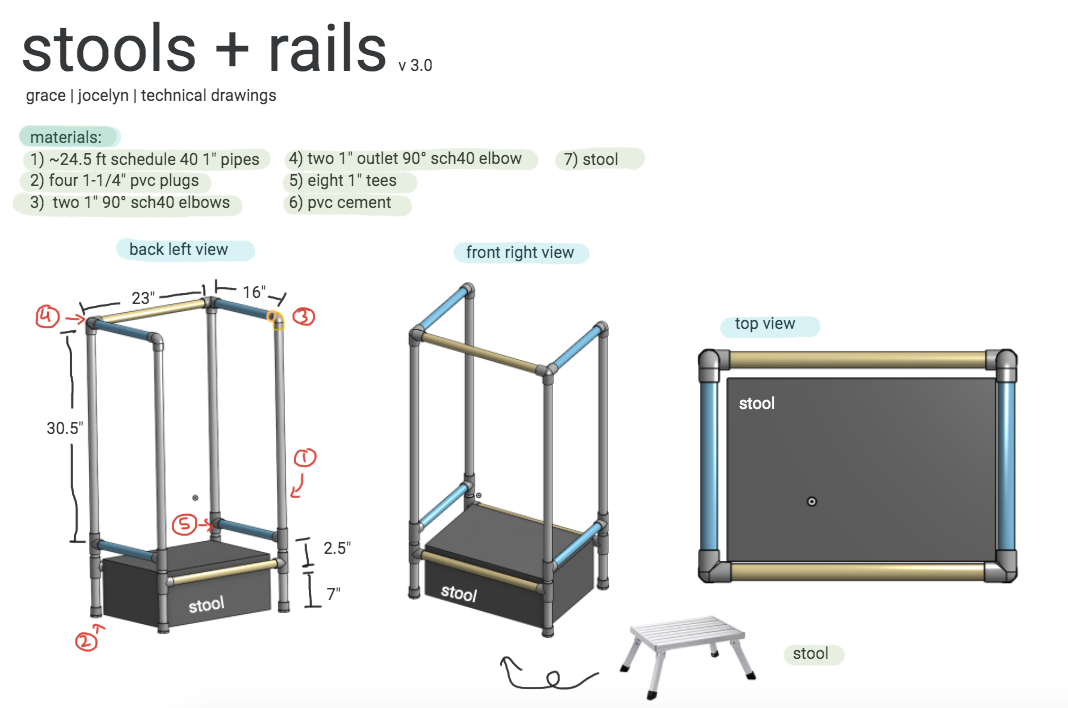
(All materials were found in Home Depot | total cost: $94.34)
- one stool
- three 1"x 10 ft schedule 40 pipes
- two 1" PVC sch40 side outlet 90° socket elbow
- two 1" PVC sch40 90° elbow
- four 1-1/4" PVC sch40 plug
- eight 1" PVC sch40 tee
- 8oz PVC pipe cement (red hot blue glue)
Useful Tools
- Electric handsaw
- Clamps
- Measuring tape
- sharpie/permanent marker
Testing Plan
I plan to test this prototype with my co-designer both inside and outside her house to see if Jocelyn could use the stool to safely garden and rearrange items on her higher shelves.
Subjective qualitative questions:
Rate from 1-10 with 1 being the worst and 10 being the best how...
- safe you felt before and after the existence of Stools+Rails
- well the height of the prototype fits you
- easy Stools+Rails is to use
- heavy the the prototype is
- easy it is to transport the prototype
- aesthetics
Subjective quantitative questions:
- What is your favorite part about the design?
- What is your least favorite part about the design?
- Are there any features or suggestions you have at this point?
Test Results
Subjective qualitative questions:
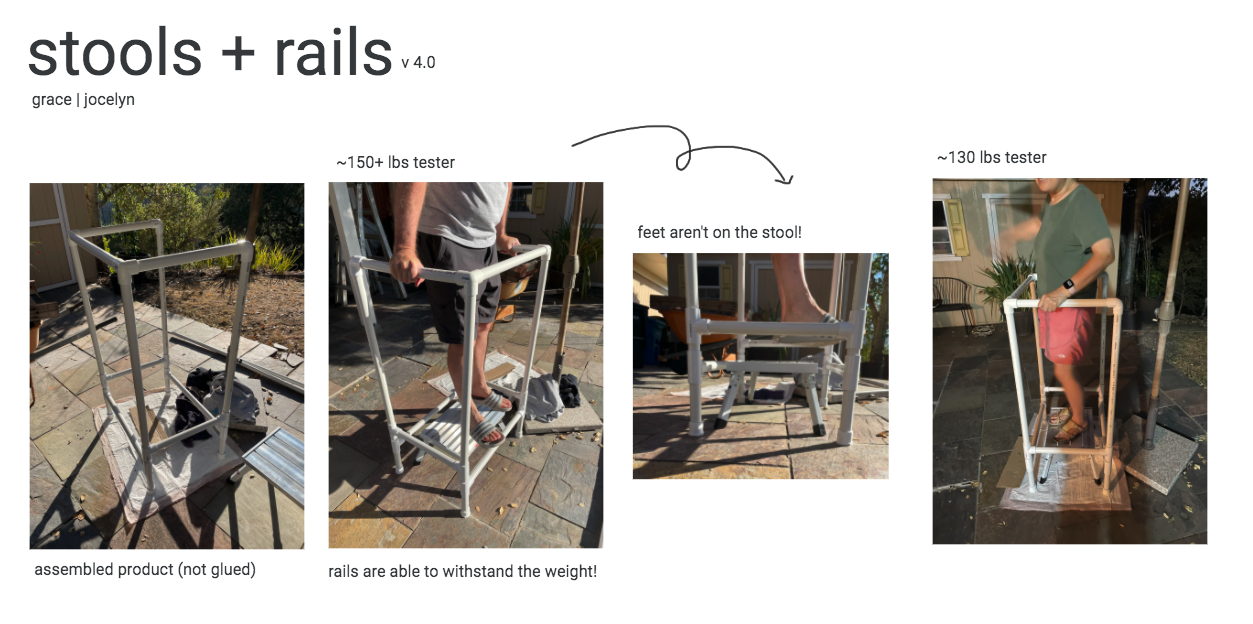
I found out that my co-designer rated getting onto stools without the railing a 2/10; however, with Stools+Rails, she felt 10/10 safe reaching for higher shelves and plants. She felt that the height of the railings were pretty accurate and helpful to her, so she rated the height a 10/10. In regards to the ease of use, my co-designer felt that the concept of using the stools and the rails together was pretty easy to understand and use, so she rated it a 9/10. However, for the weight of the prototype, she rated it a 7/10 and gave the ease of transport a 5/10 due to the bulk of the prototype. For aesthetics of the railings, she rated it an 8/10.
Subjective quantitative questions:
My co-designer mentioned that her favorite part of the design was that the railings were safe, efficient, and steady, which were the most important factors for her. My co-designer also mentioned that the bulk of the railings was her least favorite part about the design, but that the bulk was a negligible part of the design.
Observations:
I noticed that my co-designer's tomatoes were pretty large, which may make picking tomatoes an issue, especially if she does not have a bag. As a result, adding a small detachable basket onto the rails may help with storing her gardening tools as well as the fruits she may pick while standing on the stool.
Test Conclusions
I found that my co-designer, Jocelyn, was pretty excited about this prototype iteration. Due to time and pandemic constraints, I was unable to use welding and order some items because of the shipping time. As a result, I focused more on making a safe and effective stool and railing set so that my co-designer could begin using higher shelves and pick her tomatoes independently.
In the future iterations, I'd like to make something that could make transporting the PVC pipes iteration easier or focus on making the prototype more compact. For a smaller iteration, I would also look into finding a detachable basket that could help making the gardening aspect of the stool much more convenient.
Final Prototype
Build Instructions
- Discuss with the co-designer to see what they’re comfortable with, like the height of the stool
- Measure the distance between the co-designer’s hand and the highest shelf they want to reach and record that measurement. Make sure it is within the co-designer’s comfort level.
- Find a sturdy, rectangular stool online that matches your co-designer’s preferences. Take note of the height and try to make sure it is close to the measurement from Step 2. Take note of the weight of the stool, the weight the stool can withstand, as well as the base area of the stool. To make sure the co-designer is comfortable with the base area of the stool, cut out a piece of cardboard with the exact measurements of the base area.
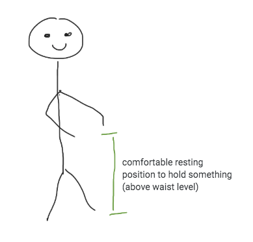
- Measure the distance between the floor and where the co-designer feels comfortable with having a railing. (Having a physical object like a rolled up cardboard tube may help with this.) Making the measurement higher than the co-designer’s waist may help with safety measures. Record down the measurement.
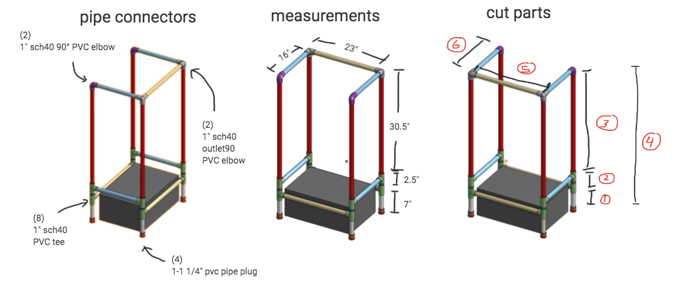
- Add the measurement from the height of the stool from Step 3 with the measurement from Step 4. This will become the total height of the railings, indicated by #4 in the diagram.
- Determine the pvc pipe thickness and the type of PVC based off the measurements and weights; a 1 inch schedule 40 PVC pipe would definitely work for withstanding ~150 lbs.
- Find the width (the longest side of the stool) and length (the shorter side of the stool) of the stepping base area of the stool and add 2 inches (adjust if the PVC is not 1” thick), respectively for a new width (#5 in the diagram) and new length (#6 in the diagram). Record the new width and the new length.
- Take the measurement from Step 5 and multiply it by 4 for the four legs of the railings. Then take the new width and multiply it by 3. Then take the new length and multiply it by 4 for the side hand railings and their respective supports.
- Add all the numbers from Step 8 together to get the rough estimate of PVC pipes and remember to add extra length if mistakes are anticipated.
- Then buy the rough estimate of PVC pipes needed. Buy two PVC sch40 side outlet 90° socket elbow, two 1" PVC sch40 90° elbow, four 1-1/4" PVC sch40 plug, eight 1" PVC sch40 tee, and some PVC pipe cement. Change the diameter of the connectors if you have changed the diameter of the pipes.
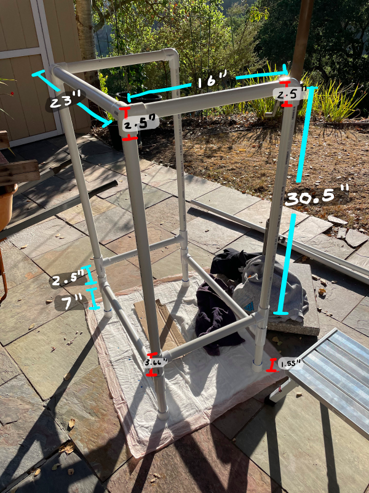
- Put the PVC tee connected a little underneath the stool to make sure that the user would not trip on it (see diagram below). Then measure from the smooth ground to the little ridge inside of the PVC tee connector. Record that measurement.
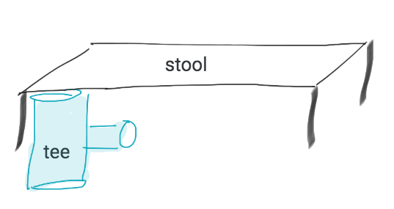
- Cut 4 pieces of PVC pipe with the measurement from Step 11.
- Measure the distance between the two tees (see diagram below; 2.5” worked in my scenario).
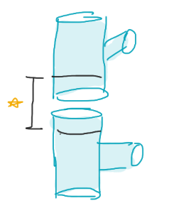
- Cut 4 pieces of PVC pipe with the measurement from Step 13.
- Measure the ridge of the tip of the tee (shown in diagram below).

- Take your intended width and length of the railings and subtract them both by the 2 times the measurement in Step 15.
- Then cut 3 pieces of PVC pipes with the newly calculated width.
- Then cut 4 pieces of PVC pipes with the newly calculated length (should be shorter than the width).
- Use all the pipes from Step 12 and Step 14 and two pipes each from Steps 17 and 18 to assemble the railings as shown below. The eight PVC tees and the four PVC caps will be needed as well.
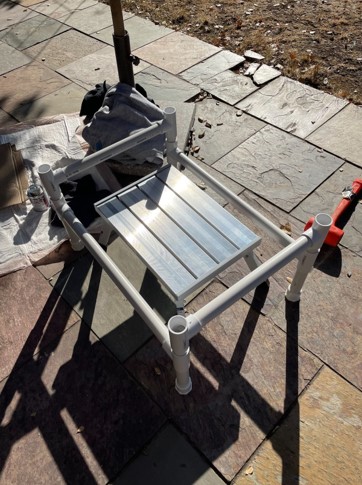
- Then measure from the ground to the ridge of the PVC tee (see diagram below).
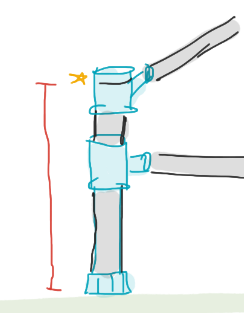
- Then measure the outlet90 PVC connector as shown below.

- Then take the measurements from Step 20 and Step 21 and subtract them from the ideal height of the railings, taken in Step 4.
- Then cut 4 PVC pipes with the measurement from Step 22. Then assemble it as shown below.
- Test and make sure everything fits.
- Then use the PVC cement to glue everything together. Follow the instructions of the PVC cement.
- Customize the railings how you wish.
Testing Plan
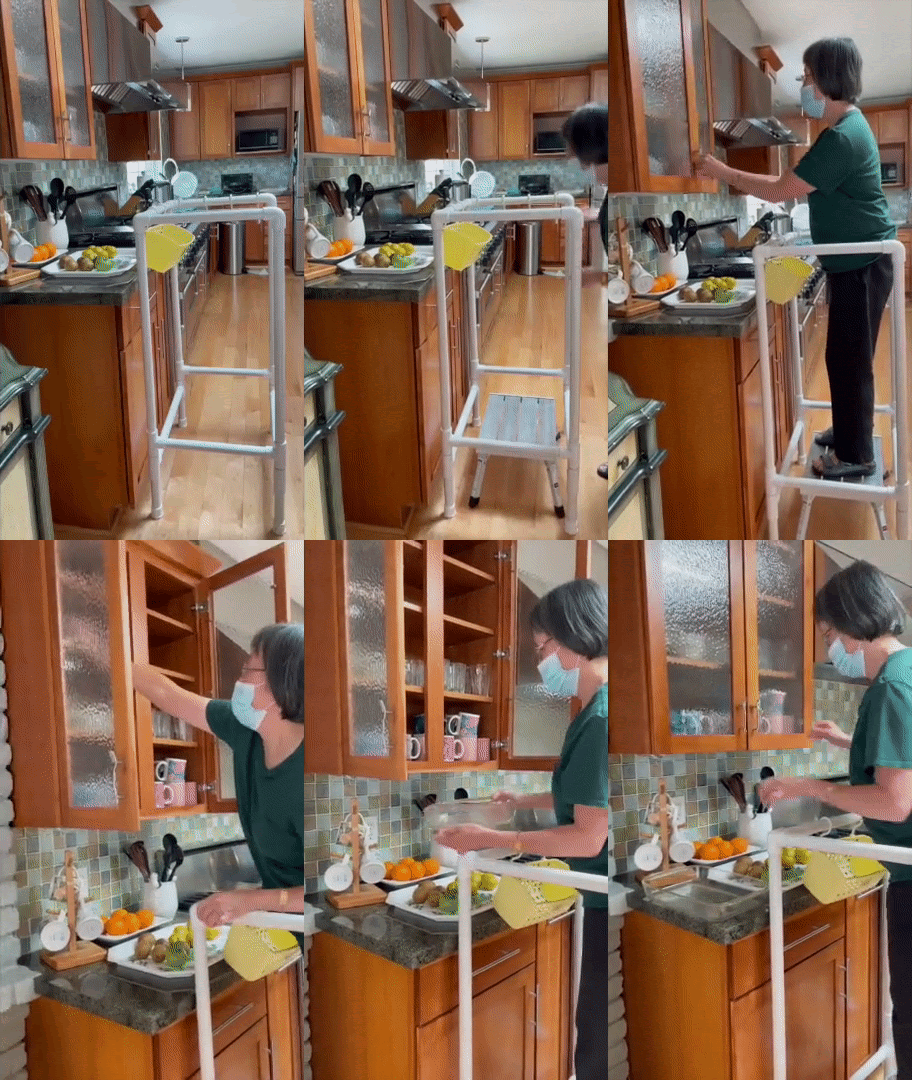
Tested the co-designer reaching the tomatoes, reaching shelves, and reaching lights around her house.
Testing Results
Results of the final test:
- The railing is able to stand alone and support the co-designer even without any hard surface supporting it on the side.
- The co-designer liked the design and would use it outside.
- However, the railings were large and inconvenient to move around.
Scalability
As PVC pipes are relatively cheap and sturdy, the product A Step Up would be relatively easy to produce. As it is sturdy and provides customized support to a user, A Step Up would also be great to use. Even if the materials came individually, it would be easy to be assembled by anyone. However, due to the bulk of the fully assembled parts, it may be hard to move around. Thus, more designings, prototyping, and testing would be needed before A Step Up is scaled up for manufacturing.
Design Process Reflection
Reflecting on my designing process, I wish I had taken more notes on what I did every day. Occasionally, I would forget to note down what I did on a particular day so I wish I had written more of my thought process down. I’m pretty happy with how things turned out in the end—as long as the product helped my co-designer and my co-designer felt satisfied with it, I would regard it as a success. I definitely struggled with communicating ideas and coming up with new designs; however, even with the virtual situation, I was able to reach out to friends, classmates, and instructors, which helped me a lot with picking the material of the railing.
Especially though designing A Step Up, I learned a lot about the design process as well as interviewing and interacting with co-designers. I also learned that sometimes a simple solution and an existing solution is okay to use as long as it is effective; for my product specifically, I could not find a lot of existing products for this particular situation. Through the several presentations in my class, I also learned how to talk more comfortably. Most importantly, I was able to help my co-designer out with her balance, which really made my month of work enjoyable.
Depending on feedback from my co-designer in a couple of weeks, I may be able to continue working on improving the prototype to fit my co-designer’s preferences. I’m extremely thankful that I was able to help someone out and that I was able to meet such special people throughout the timeline of this course! It opened my eyes to the things that I was able to do and I’m excited to see where life brings me next :)